Friday, July 30, 2010

Sketches on Wacom Bamboo

My best friend Kanth in a scholarly look

My colleague Vengal's sons

VasaV - My friend Lavanya's son

Shruti - my senior Raghava's daughter

Pari - sweet daughter of my seniors Sreekanth & Vasudha


Koustu - My niece

Koustu - my niece

Kung fu legend - Jet Li

Ananya - My friend Sudha's niece

The 3 Idiots

Monday, May 17, 2010

Sketches and Paintings on paper


Bruce Lee - The LegendFighter

Angelina Jolie
The Warrior


Mother's Day special

Garfield is scared of Mondays ;)Parent -Child Love


Angry dude


Calvin & Hobbes


The Kungfu Panda :)


Friday, October 23, 2009

Learn to draw and paint Donald Duck

Here comes the second lesson on drawing Donald Duck. Here we are going to draw it and paint it with Acrylic paints.

First of all draw a Donald (google some Donald wallpapers and draw one). Bear with the picture clarity. You can hardly see anything on the initial sketch below, as I made the sketch very light with pencil; keeping in mind that lines should not be seen after painting.

Here it goes...
Donald's body will be white in color, but never leave the body with out painting white even if the paper on which you are painting is white. In the below snapshot you will see that I have painted the body of Donald white and shirt with light blue.I am going to paint the shirt in 2 different shades. So, I added a tinge of navy blue and white to the light blue I used to paint the cap. Fill the strips near handcuffs and collar neatly with lemon yellow. Paint the legs with light brown as shown below.Oops! I painted the legs too dark. I added 3 brown + 1 white and painted the legs again to make it lighter. The beak is also painted in the same color. The bow tie and tongue are painted in red.Now lets paint the background; the easiest part. Its your wish to create your own background. I have done it like this...The last and most important part is to draw outlines. It brings a lot of change and grace to the picture. The final one looks like this...The drawings I make have no comparison to the master piece the legend had created. So, I keep on practicing ;-)

Learn to draw Donald Duck's face

Hi guys, hope you are all doing well. I am going to publish 2 posts today; both are on Donald Duck. In this post let us see how to draw Donald Duck's face. Legend - Walt Disney created Donald Duck's character in 1934 and introduced it to readers through his comic Mickey and friends.

It is pretty simple to draw a Donald Duck. This time I bought a magnetic board to draw so that it would be clear for you. I will try to explain more with the pictures rather than explanation because you will see that we can draw it in 6 simple steps.

Always draw the eyes first, I am going to draw Donald's face turned a bit towards left.Next comes the beak, draw simple connecting curved lines as shown below to complete the upper part of beak.and then...Simple! right? Now let us complete the lower part...Now, lets draw the eyebrows and the head part...
Next comes the cap and little touchup completes Donald's face...It comes out really well on a paper. Next post will be on how to draw a full picture of Donald and paint it.

Thursday, September 10, 2009

Pencil Shading - Drawing a portrait

In this post I am gonna describe how I made a portrait of a cute little girl (her name is Munni). I have a serious problem in drawing hair. I don't know how to draw it. I can say 'this is my first serious attempt'. Some times I even avoided drawing which involves drawing hair [:P]
Anyways, the topic is not on drawing hair, I will post one when I learn the technique or create my own one.

I always draw on rough side of the sheet if I am making a pencil sketch or painting something. The basic outline of the portrait should be drawn very lightly on the sheet. Don't make a dark sketch at the first go. After I am done with the outline it looked like this.
I know you are going to kill me now. I will take the pictures with my camera and not with my mobile from next time. Except the details, everything else should be planned while drawing the outline itself. Beautiful eyes always brings life in the picture. Draw eyes carefully (see my post on how to draw eyes).
Next comes shading and smudging. Imagine light coming from one direction while shading the picture. Say, if the light is falling from right, left outlines should be shaded darker than the right ones. Once the shading is done, take a small clean paper, fold it in triangular shape and some extra paper to hold (The sharp edges of the paper helps to smudge smaller areas of the picture).
Though I have managed to draw the girl's picture it didn't really match her original beauty.

Saturday, December 20, 2008

Learn to draw an EYE >>> ( (o)

As I promised, this time I am going to give a "detailed" explanation of 'How to draw an Eye?' - my second post. Eyes are the most important part to focus on while drawing portraits. They denote the feelings of a person. Observation plays major role in drawing. For example, people like to see pleasing faces, so while drawing such eyes, observe that pupil of the eye dilate when someone is pleased. So draw a wider pupil to get that feel.
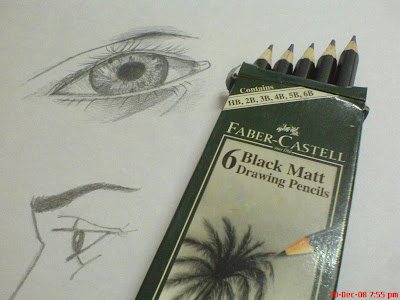
Coming to the point, I am doing a pencil sketch this time, working on the rough side of the sheet. I am using Faber-Castell pencils. These are so fine for pencil sketching/shading.

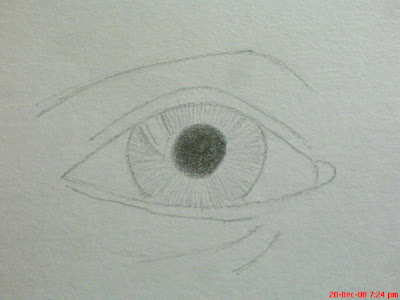
Sometimes I draw the eyelid edges, then the iris, sometimes the iris then the eyelids - it works either way. I usually draw the iris as a full circle then erase where it overlaps the eyelids, so that the shape is correct. Then I draw the outer eyelid edges and any folds or creases around the eye.

First check for any highlights cutting across the eye surface, and lightly outline these (HB). Shade the iris using directional shading to mimic its radiant patterns. Shade the pupil too (4B), establishing good, solid darks. Watch out for highlights across the pupil too - if they are there, put them in. As I told, I am making the pupil wider to bring a friendly look. Also make a highlight curve across it, to emphasize the shiny curved surface of the eyeball.

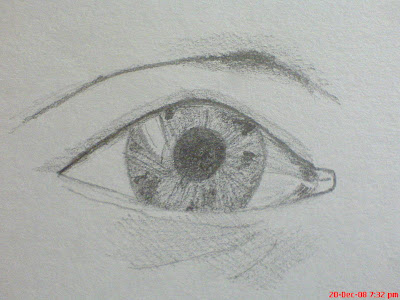
Now I'm adding some shading to the drawing. I add a fine layer across all of the inner white of the eye, and very, very lightly across the outer one (2B). The 'whites' aren't really white, but slightly shaded with 2B. Reserve pure white for your highlights as much as possible. Use eraser whereever you feel necessary. And now, I add a layer of shading to the upper eyelid, an some shadows around the eye. At this stage, the shading is quite strong (3B/4B) - I'll soften it with an eraser (You can cut the eraser with a blade angularly to erase small portions). You can't see all the details in the pictures ;-) pics are taken in the night under tube light.

The eye drawing is almost finished. The shading in the eye is completed, making sure the white highlights are crisp. Notice the shadow drawn under the upper eyelid. This helps to give it a more three-dimensional look (I couldn't make this well). Skin tones require a fine touch with shading. I used an eraser to lift excess tone, sometimes re-drawing several times until I get the subtle shading that I want. I have made the shading in the whites of the eye a little darker so that the highlights look brighter.

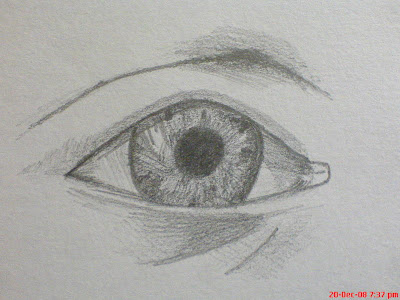
Notice that I haven't drawn the eyelashes yet. I want to be able to smudge and erase the tones on the eyelids without disturbing the eyelashes. To finish off the eye drawing, I've softened some of the shading further to create quite a smooth effect, and crisped up the highlights in the eye. Then I have added the eyelashes. Look carefully at the eyelashes - note where they start. A few hairs straying inwards, but most eyelash hairs grow quite precisely out of the front edge of the eyelid. Use an almost flicking motion, lifting the pencil towards the end of the hair, to draw the natural taper of the eyelash.

Drawing side view:
I always had a problem in drawing the side view of an eye until I observed great geometry in it. Have a look at this pic:

Start studying the structures, everything in this universe is a marvel. Look at the geometry of side angle of the eye. Simple... right? :-) we need to erase certain portions of this basic drawing later. Now, highlight necessary arcs. I did a little bit of smudging to the eyebrow. Isn't this easy?
(Please bear with the bad picture clarity. They are taken with Sony Ericsson K750i - 2MP camera).

Thursday, December 11, 2008

Starting with my favourite colour - [Blue]

Hi friends, I actually don't draw/paint regularly... recently I did a painting totally in Blue - my favourite colour. I just wanted to pin it on my office desk. After I am done with the whole thing, I got an idea of writing a blog on the drawings and paintings that I am doing. Though I am not a very good painter to take drawing lessons, this blog would be more like how I am working.
My first post, this one, won't be too descriptive because I am going to show you just the final painting. You can expect more detailed explanation of how I am drawing/painting from the next post.
Here it goes...
Necessary items:
White Chart (I prefer a thick one)
Apsara HB pencil
Apasara non-dust eraser
A soft cloth (which can absorb water well)
Water
A pad to mix colors (a porcelain saucer or a small steel plate will also do)
Brushes I used:
Jayna [#5] flat - series 51 (for backgrounds)
Jayna [#3] round - series 51 (for colouring detailed pictures, #2 will also do)
Mayur [#0] round - series 007 (for highlighting and borders)
(I prefer Jayna brushes because they are of good quality, not so soft, not so hard, they have brilliant tips which can sustain rough use)
Colors I used for this painting:
Camlin Artica water color tubes (this is actually for students)
075 Chinese White (1)
351 Prussian Blue (31)
056 Cobalt Blue Hue (32)
207 Ivory Black (2)
(Did I tell that I am using all blue combinations in this painting?)
How to start?
We always get the sheet rolled. First make it flat by rolling on the other side. Whatever drawing/painting it is, I prefer to do it on the rough side of the sheet... reason? it absorbs the water colors and doesn't flow on the sheet... we get good shades on the rough side... even while doing pencil shading I prefer the rough side.
Especially when I am painting, I draw the outlines, figures everything very lightly. Because after painting the whole thing, those lines should not be seen. My policy, never start anything with the background colouring. I painted the stems and birds with #3 round brush. Here, I painted stems first with a mix of cobalt blue and chinese white. It looked totally plain without any other shades. Then I mixed it with prussian blue (very dark) and gave few touch ups on the stems. I didnot use black in the middle of the painting. Once you use black, you cant change its colour even you mix it with any colour. So, I used black at the end.
Then I worked on the birds. If some part of the bird is white, don't leave it like that because the paper is white. Instead, paint it white. I mixed a tinge of black in the white to show the depth of feathers. Donot paint it plain, give gentle touch ups with the brush to make it look like feathers.
Now, its time to do the background work. I mixed 1:5 cobalt blue in chinese white to paint the background. I used #5 flat brush. Donot scribble with the brush. Follow one direction to paint the background as it is sky. I painted it in horizontal direction with different intensity of the same mix to make it look like sky. Be extremely careful while painting the area near birds and stems. Use #2 or #3 round brush if you have no practice of using a big flat brush.
After this is done, use #0 brush to highlight the birds and stems with ivory black. The background should be light and the birds/stems should look bright. Take your time to highlight them carefully. Be extremely careful while using black. Use a soft cloth incase of blotting. Keep the painting in a dry place until the colours settle. Thats it...